![]() high precision
high precision
Development and production of high precision optoelectronic instruments and measuring systems for the metrology, transport, optical industry and research.
![]() stability
stability
Several years of experience of development and implementation of innovative solutions. Perfect technological level of Company, stable marketplace and reliable subcontractors.
![]() competency
competency
Measuring systems and solutions directly from inventors and developers.
Introduction
Founded in 1999 in Switzerland ZG Optique SA has been developing and producing high precision optoelectronic instruments and measuring systems for the metrology, transport, optical industry and research. The company's team consists of high-reputable scientists and experienced specialists in development of optical measuring and inertial systems.
Integrating the cutting-edge technologies in optoelectronics, inertial navigation, GIS, image processing, and adopting its algorithms for the railway applications we design up-to-date systems for rail diagnostics.
ZG Optique SA has a wide list of customers from all over the world: Switzerland, China, South Korea, Italy, Spain, India, Russia.
Experience
The scientific group of ZG Optique SA deals more than 20 years with issues of inertial technologies for safety of railway traffic. During this time 2 doctoral thesis and 7 master's thesis on subject of the scientific research works are protected. More than 100 scientific publications of the collective are devoted to the problems connected with diagnostics of a railway line.
Development of the integrated navigation systems on a railway track was one of the directions of scientific researches. The main point of this development consists in construction of correction algorithm of the odometer on which error the accuracy of diagnostics results localization depends. Approbation of the offered algorithm and also the integrated navigation system on a railway track constructed on its basis was realized on the German track measuring car (TMC) OMWE. The analysis of experimental thoroughfares showed that as a result of use of the developed system the relative error of the odometer is reduced from 20 m to 2 cm by 20 km of the travelled distance. By results of tests the correction algorithm of the odometer was introduced in structure of the OMWE car of the research center of Germany railroads (Minden). The integrated navigation system also passed tests on the Russian TMC CNII-4 and allowed to increase relative repeatability of the travelled distance (~ 8 km) on the same track section to 2 m while the divergence of indications of the odometer made 26 m.
Other line of activity is development of specialized measuring devices. The definition of angular position of the car body relative to the horizon is required for measurement of geometrical parameters of a railway track. This problem with high precision is solved by SINS which block of sensitive elements contain three laser (LG) or fiber-optical (FOG) gyroscopes and three accelerometers (Ac). Thanks to a large quantity of a priori information on a structure of a railway track, reduction of number of sensitive elements and creation of a new class of systems of artificial horizon construction – analog gyroverticals of the truncated structure (AGTS), became possible. AGTS1-2 passed tests and was introduced in structure of the car measuring instrument of a contact network (CMICN) and TMC of the St. Petersburg underground.
Since May, 2011 on Oktyabrskaya Railway the flaw detecting car AVIKON-03M developed by JSC «Radioavionika» by request of JSC «RZD» started being exploited.
The structure of a diagnostic complex included new systems, among which the small-sized inertial system of railway track diagnostics (MISD RP) developed by research team. Due to installation of micromechanical sensors on axle-boxes of wheel pairs of the bogie, the system defines defects on roll surfaces of rails and other short geometrical irregularities (roughnesses) in a profile. The preliminary analysis was carried out on the basis of the data written down by MISD RP in the course of year. It showed the high repeatability of diagnostics results from journey to journey. It was a practical confirmation of the possibility of creation of the GIS for storage and display information on a railway track technical condition.
In December, 2011 the testing of set composed of 4 inertial measurement units installed on axle-boxes of the high-speed bogie of track measuring car KVL model P3.0 (INFOTRANS) was carried out. Results of tests have demonstrated readiness and working capacity of micromechanical modules for determination of the short irregularities and defects on roll surfaces of rails in the conditions of the increased movement speeds (to 160 km/h).
In 2012-13 by request of group of companies «Tvema» (Russia) two sets were developed to equip of track-testing car for definition of geometry of a railway track. The sets solved the problem of synchronization of various measuring instruments (SINS, odometer, SNS receiver) with the head computer.
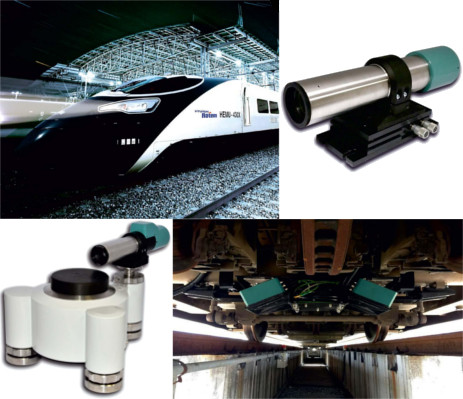
In 2014 Track Geometry measurement system (TGMS) on the basis of SINS and optical sensors has been designed for KRRI (Korean railway research institute) by the scientific team. Two sets of TGMS were delivered to South Korea. TGMS were on special measuring vehicle driven by high-speed train HEMU430X (maximal speed 430 km/hour, maximal speed during the measurements 350 km/h) Qualification runs were fulfilled in 2017.
One has to note that at a development stage of the first prototypes of the inertial systems adopted for railroads, the problems of their calibration arose before scientific group. It served as the terms for researches of instrumental error of angular rate sensor and linear accelerometer, and also three-axis units on their basis. As a result new algorithms of calibration were created and also requirements to the test equipment are developed. Since 2008 biaxial and triaxial test benches with heat chambers and without them for calibration of inertial sensors and SINS on their basis have been made by the scientific group. Also programs and techniques of primary and periodic certification of equipments were developed.

